Frame
After working with the frame it is clear that it is intended for use with electronic shifting only.
It officially supports mechanical shifting but the implementation is more of an afterthought and not well suited.
The two main cable entry points of the frame, the headset and rear triangle exposed issues with tight cable bends in these areas preventing shifting.
The second can be excused as the rear hydraulic line routing was not intended to fit an additional two extra gear cables.
For the Venge the Axle plate cannot be placed under the stay, this is because routing the cable from the hydraulic brake hole it too much of an aggressive angle.
Conversely the Yoeleo frame allows the axle plate to be in this position and have shifting work well as the cable hole is placed much closer to the centre of the stay.
In the Venge the hydraulic cable exit port is situated very close to the caliper.
I also had some issues routing cables through the chainstay because they would get caught on a lip.
After many failed attempts to pass this I got a cheap USB endoscope to see what is the cause which will make it easier to be overcome rather than blindly guiding cables.
Using the hook attachment I could move the cable past the obstacle.
The frame is clearly manufactured in separate sections which are bonded together later, one such is part of the rear triangle the cause of my issue.
I discovered an image of a pre-finished SL7 frame were you can see this bond and I assume the Venge is made in a very similar way.
Cables had to be routed into the rear hydraulic brake exit port first then towards the bottom bracket and onward to the headset.
The reason is because doing it the other way round made it impossible to fish three cables through the hydraulic exit hole.
When I tried routing cables this way it did not catch the lip.
The Gebla was originally placed under the chain stay in a similar fashion to the way it was on the previous build using the Yoeleo R6
see here. Disappointedly this bend was too tight for shifting to work properly in a similar way to the headset issue.
The exit hole is simply too close and angled
towards the wheel away from the Gebla.
The next option was to route cables over the chain stay and move the Gebla shift box, this required new gear outers as they were now cut too short.
Moving A12 Rohloff to New Frame
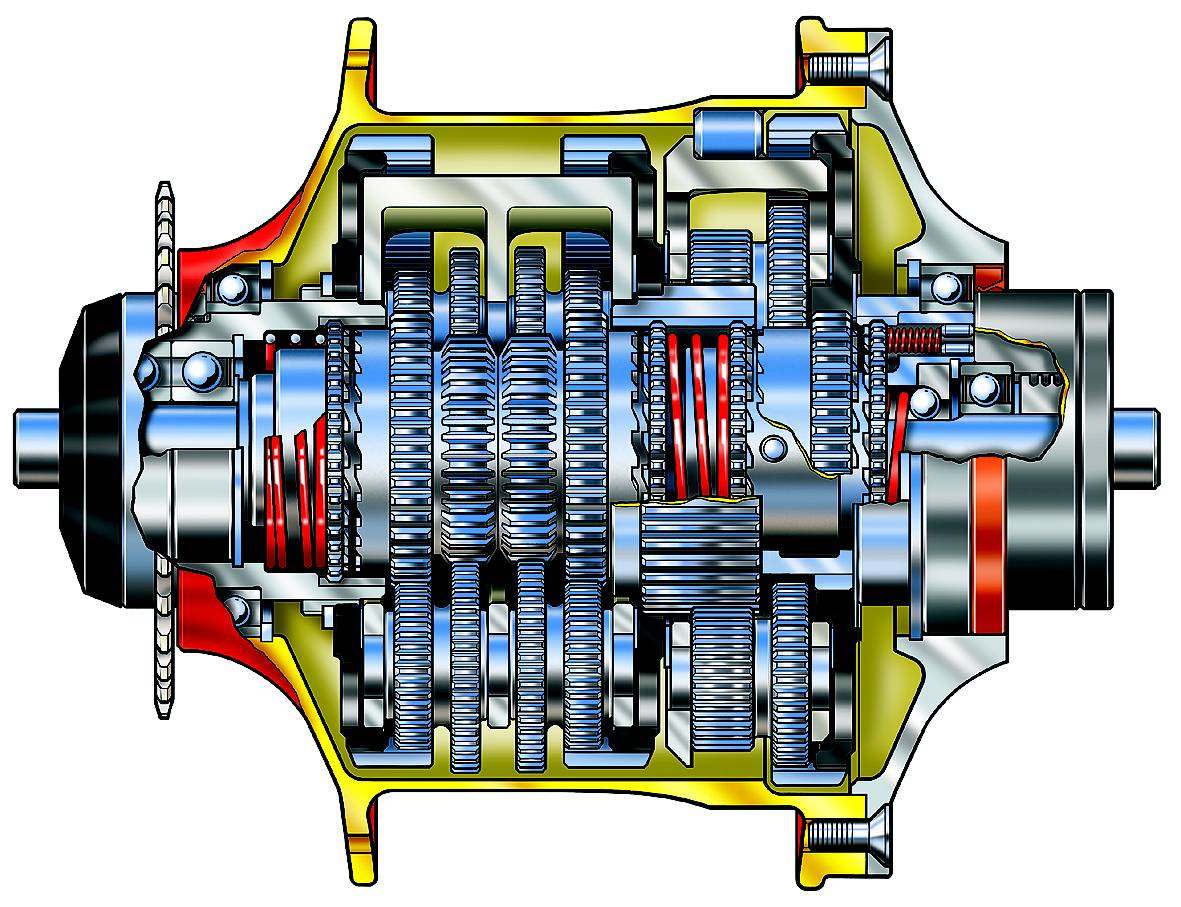
The Rohloff hub was designed well before the thru axle standard.
If you look at a cut out or exploded diagram of the hub there is not enough free space for a 12mm diameter axle but does allow a Quick Release Skewer.
The only hub with native thru axle support is from Kindernay.
Rather than redesign the hub Rohloff opted to have adapters that match the frame dropouts to allow M7 bolts to secure the hub.
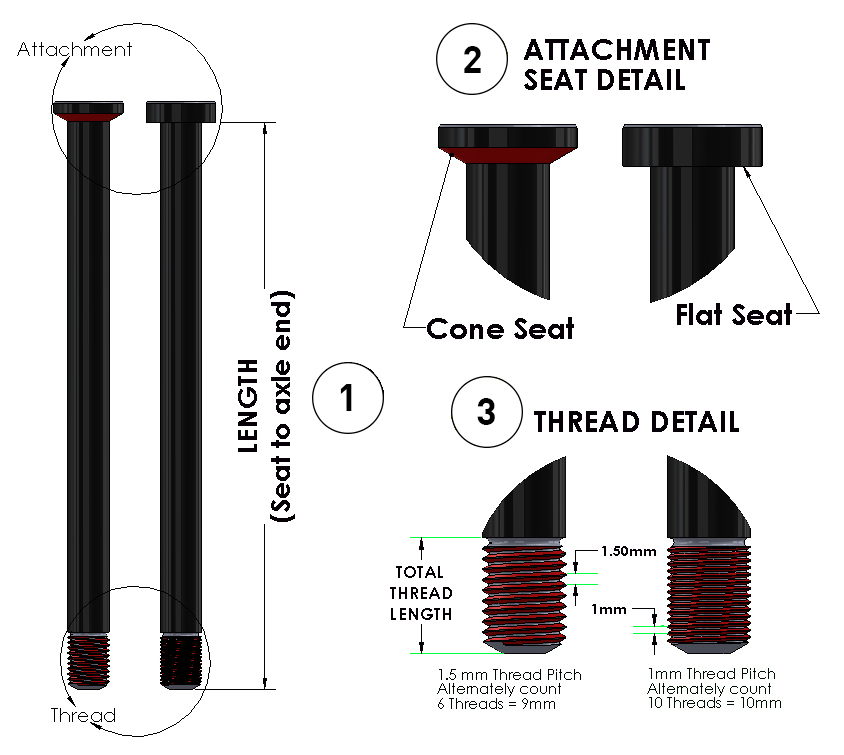
One issue with this is that unlike Quick Release, there are many thru axle standards.
Total length of the thru axle can vary dramatically between manufacturers. A "Standard" 142x12mm Thru Axle can vary in length between 162mm and 171mm depending on the frame manufacturer.
There are also different thread pitches generally M1 or M1.5.
There are two different types of attachment seat used at the interface where the skewer mates to the frame or fork which are traditional (flat) and conical
These include different width, diameter, thread pitch and even the interface.
My hub has adapters for the Yoeleo R6 which uses the Shimano e-thru axle while the Venge uses a Syntace V2 interface (according to Rolhoff dropout measurement process) so new adapters would be needed.
I took my bike to the nearest shop that was registered with Rohloff as a dealer and asked them if it was possible to get the new frame measured and order new adapters.
They didn't understand my request at first and later turned out they had never dealt with A12 Rohloff hubs before.
My contact at the shop got training from Rohloff on how to perform the task, later the measuring kit was sent to the shop and the procedure was done.
Disappointingly Rohloff have a minimum dropout thickness rule which the new frame
. The bike shop stated to me that the minimum thickness test is 51mm while the Venge got 49mm.
Regardless I requested to order the adapter anyway without warranty and that I would take all responsibility.
When writing this article a few months later I checked the
Rohloff A12 Dropout Measurement Process document and there is no mention of 51mm, the Syntace V2 test on page 45 states the minimum thickness is 47mm, so the frame should have passed.
Bottom Bracket
The Venge comes with a BB30 bottom bracket, there is an aluminium insert that houses the bearings.
One issue with this standard is that the bearings are close together in the 68mm width shell.
This exposes them to additional strain which can lead to a lower lifespan, other standards such as BB86 place the bearings further apart.
BB30 has had numerous complaints throughout its history with issues such as creaking and the aforementioned short bearing life.
This is typically caused by poor manufacturing tolerances from frame manufacturers resulting in bad fit or even misalignment causing premature bearing failure.
To avoid these issues I looked into a bottom bracket conversion kit.
There exists BB30 to BB386 converters such as the
so I could use my existing FSA BB386 crank but the spindle is showing signs of wear which is in need of replacement.
My own fault for not taking better care.
Alloy 30mm spindles need to be cleaned regularly, the hard steel bearing makes direct contact to the softer aluminium spindle which can cause galling if not properly maintained.
So I decided to move to a similar crank using MegaExo 24 which uses a steel 24mm spindle, which as far as I can tell is directly compatible with Shimano HollowTech II.
One advantage of HollowTech II is that the spindle is steel and the bearings have a plastic cover so the spindle does not make direct contact.
A disadvantage is that the crank will be a little
a tradeoff for a more durable item. Cranks with alloy spindles almost become a consumable item like a chain or cassette which is not ideal.
With this in mind I got a BB30 to BB86 converter, the one I have allows the bearings to be replaced and I ordered some spare 6805 bearings and plastic top hats.
The replacement FSA crankset is made for MTB so it has an effective spindle length of 92mm (86 + 5).
An issue is that the Venge frame has a 68mm, so when the BB30 to BB86 converter is installed the final width will be 86mm, 5mm of extra spindle length will need to be taken up somehow.
I fabricated 2 spacers measuring 3.5mm for the drive side and 1.5mm non-drive to take up the slack.
Headset Spacer
When the cables were routed I noticed very high friction in the cable.
I could change a single gear once then the return spring in the Gebla could not reset the ratchet.
Fully removing the inner cable and slowly feeding it back in I noticed a sharp increase in friction when entering the headset.
I determined this by removing the inner cable when the friction increased and measuring the length of cable that had been fed in.
Then roughly gaging where this is in the cable route.
I did a lot of investigating to the cause of the problem and discovered that cables entering the headset are at a very tight angle.
Adding slack and adjusting the outer cables did not help with the issue.
The Venge is clearly tailored to electronic shifting and not too well suited to mechanical shifting.
Looking online there is a headset for which supports mechanical shifting but my frame did not come with it.
To work around this I designed a replacement spacer to allow a smoother cable transition into the headset.
This needed a few revisions to match the unique shape.
Rear Light Mount
One interesting feature of the Venge is that it can house a Di2 junction box in the back of the seatpost such as the EW-RS910.
These are originally designed to replace a road handlebar end cap but Specialized has retrofitted the design to fit inside the seatpost, this is a neat integrated design choice.
I have looked at lights that fit into
but these do not produce much light and should be considered a complementary safety light.
Another option is a saddle mounted light, this is what I used in the original bike build, they are discrete and not very protruding.
One issue is that the position of the light is so high that it can easily be covered by a coat or bag.
This is not a big issue but I wanted to create a much neater and integrated design.
As I am not using Di2 rather than fit the included blank I thought it would be a good idea to repurpose this into a rear light mount.
My design is in two parts, this is because I decided to reuse the existing cover.
The first is a direct replacement for the junction box, it allows the second part which is the light mount to be secured to the seatpost via 3 screw holes.
PETG was used for both parts as it is more suitable for outdoor use as it does not degrade in UV, unlike PLA.
The print direction of the mount is critical and needs to parallel to the living hinge or it will fail quickly.
This is not to best orientation for the rest of the part as it results in a lot of support material.
Front Light Mount
The Venge has a cable clamp for tidying the cables under the stem.
There already exists an official mounting mechanism which attached to the front faceplate.
Looking at this it is possible to use this to mount a front light.
This is good if have a cycle computer but I do not currently use one.
Placing the light directly underneath the stem puts it in a more discrete position.
Brake Caliper Change
Gone are the Hope RX-4, they looked excellent but I had a lot of issues with sticking pistons and they were a challenge to bleed, so I started looking into alternatives.
This led into an investigation of how hydraulics work and if it is possible to fit different calipers to the HydroR levers.
The levers use DOT fluid so I need to make sure I select DOT compatible calipers not ones designed for mineral oil.
Do not mix and match these as the seals are only designed for one type of fluid and might corrode and fail catastrophically.
Hydraulic Theory

This is some background information on how basic hydraulics work in order to apply this knowledge to determine if it is possible to mix and match levers and calipers.
In this example the surface area of B is 5 times greater than A. So an input force of 30 Newtons f1 results in an output force 150 Newtons f2 which is calculated: 30 × 5 = 150.
This comes at a cost, if A moves down 25cm then B only moves 5cm. So you have traded a force amplification for a reduction in travel.
Lever and Caliper Compatibility
 SRAM Red HydroR
Release date: 2014
Mechanical only (Rohbox compatible)
Reservoir and master cylinder size unknown
SRAM Red HydroR
Release date: 2014
Mechanical only (Rohbox compatible)
Reservoir and master cylinder size unknown
 SRAM Red AXS
Release date: April 2019
Electronic only (Rohbox incompatible)
Bigger reservoir and master cylinder for larger pistons?
SRAM Red AXS
Release date: April 2019
Electronic only (Rohbox incompatible)
Bigger reservoir and master cylinder for larger pistons?
The size of the SRAM HydroR master cylinder area is unknown (A), but we can calculate (B) the surface area at the caliper end.
I can make a best guess with a constant (A) and see the effects of different calipers assuming the reservoir is of sufficient size.
The HydroR caliper has 2 18mm pistons, so we can calculate the surface area on one and multiply it by 2 to get the formula: 2πr2.
Manufacturers such as Shimano and SRAM do not provide a compatibility list and explicitly state no compatibility between models even in their own product lines.
If manufacturers published master cylinder sizes and resviour sizes you could make reasonable decisions to mix and match levers and calipers of the same type of hydrailic fluid.
 SRAM HydroR
2 x 18mm diameter pistons
2π92 = 508.9mm2
SRAM HydroR
2 x 18mm diameter pistons
2π92 = 508.9mm2
 SRAM AXS HRD
2 x 21mm pistons
2π10.52 = 692.7mm2
SRAM AXS HRD
2 x 21mm pistons
2π10.52 = 692.7mm2
 Hope SRAM RX-4
2 x 11mm pistons
2 x 14mm pistons
(2π5.52) + (2π72) = 497.9mm2
Hope SRAM RX-4
2 x 11mm pistons
2 x 14mm pistons
(2π5.52) + (2π72) = 497.9mm2
 Hope SRAM RX-4+
2 x 14mm pistons
2 x 16mm pistons
(2π72) + (2π82) = 710.0mm2
Hope SRAM RX-4+
2 x 14mm pistons
2 x 16mm pistons
(2π72) + (2π82) = 710.0mm2
 Hope X2 Flat Mount
2 x 22mm pistons
2π112 = 760.3mm2
Hope X2 Flat Mount
2 x 22mm pistons
2π112 = 760.3mm2
The original Hope RX-4 SRAM has a similar surface area to the original calipers highlighted in blue above which makes sense as Hope advertised the RX-4 SR as a direct replacement.
There is a revised model known as the RX-4+ which uses bigger pistons for a total increased area of ~40%.
I contacted Hope and they said that the RX-4+ will work fine with both the newer AXS and older HydroR levers.
This is interesting as the new AXS caliper has 21mm pistons and a similar area to the RX-4+ and likely intentional highlighted in orange above.
I contacted Hope and they said that the RX-4+ will work fine with both the newer and older SRAM levers.
The size piston surface difference is quite big and I'm not convinced the older levers which are designed for 18mm pistons would work well with the RX-4+.
Taking Hope at their word I looked at if it is possible to use the Hope X2 flat mount caliper.
It is even larger but not too dissimilar to the RX-4+ being 7% bigger.
Contacting Hope they recommended against the X2 as the reservoir may be too small.
Rather than risk getting the X2 and not being able to return a used caliper I got a new pair of the original flat mount calipers.
Brake Pads
When looking to purchase some extra brake pads I noticed that Shimano BR-M555 pads had a very similar shape to the pads for the HydroR.
The shape is unique as most other brake pads have the pad axle hole in the centre rather than off to an edge.
The BR-M555 is a few mm taller than the HydroR, the springs are very similar and from my testing are interchangeable making then compatible with either type of pad.
If you have a wide rotor then you can take advantage of the taller BR-M555 brake pads.
One thing to note is that with the same pad material there will not be an increase in braking power with a larger pad.
This is because the force from pistons will not change and will simply be spread over a larger area.
The advantage over using the larger BR-M555 is longer pad life and better heat management.
The HydroR braking surface has an approximate area of 351mm2 while the BR-M555 is 18.5% bigger at 416mm2.
The costs of either type brake pad are similar but there are fewer choices available for the BR-M555 as the Shimano Deore C900 caliper they are made for has long been defunct.
SRAM Hood Tear
After a few months of use the inner section of the hoods began to tear with the previous Yoeleo build.
This is caused by the shift lever making repeated contact with the rubber during each gear change.
On
Weightweenies other people have had a similar problem
typically only on the right shifter.
This is because this lever controls the rear derailleur which has much more frequent use than the left shifter controlling the front derailleur.
Explaining why this happened to these people right hand side first.
For me both levers were affected because they are in constant use with the Gebla, right shifter to move to a harder gear and left to an easier.
Bikerumor published an article stating that some people were having issues of sticking shifters and even suggested cutting the hood to alleviate the problem.
I adapted a similar approach with new hoods and carefully cut a hole so that the lever can move freely.
This is poor design from SRAM, designed to fail.
Shimano Shifter With Gebla Investigation
Ordering a pair Shimano Dura Ace R9120 shifters I wanted to determine if it is possible to use them with the Gebla.
I could not find any materials from Shimano or other places online on how disassemble/repair these shifters.
I created a custom tool to interface with the four tooth profile of the bolt and adapted it to a 5mm hex.
The bolt is soft and I probably make from an Aluminium alloy, one thing to note is the left shifter bolt is left hand threaded, right is right handed thread, the safety pin can be easily removed.
The older
ST-6700 shifter uses a common
not sure why a proprietary bolt is needed other than to limit user repairability or maybe for a marginal weight saving.
The left shifter only needs a single pawl to be disabled and can be done easily with removal of the pawl spring.
It is a similar story the right shifter, but two pawls need to be disabled.
The first can be done in a similar fashion to the left shifter but the other pawl and spring is fixed in place by what looks like a dowel pin.
No amount of force I used could budge it, I placed an obstruction to stop the pawl engaging but it would only work a few times before it would slip.
There is destructive method, using a rotary tool with a cutting wheel the pawl could be removed permanently.
Shimano shifters use the larger lever for down shifting and braking while the smaller one up shifts.
If the two pawls were disabled then the smaller shifter would not work, this is as intended.
I could leave it free flowing, remove it or bond it to the larger lever.
One bigger issue is that the cable pull of the Shimano is approximately 2-3mm less than the SRAM, as a result it is likely that a single lever throw would only change a maximum of one gear.
The lever was never tested with the Gebla to verify this is the case as I could not find a non-destructive way to get the desired result.
When using the SRAM shifter a short throw can change one gear, continue the stroke to move a second gear.
I reassembled the shifters and returned them.
I would have preferred to use a Shimano shifter as mineral oil is non-corrosive and lasts a lot longer.